Basic techniques
Table of contents
REMINDER: after every experiment, clear down your lab bench and spray with Virkon to decontaminate the surface.
Streaking a plate
Objective
To grow bacteria on a plate such that a single colony can be reliably isolated
Rationale
Having a mixed population of cells in a bacterial culture can confound experiments and it is critical that this risk is minimized. One of the best ways to ensure that a bacterial population is uniform is to perform a streak plate, which will dilute a dense culture of bacteria on a single petri plate such that a single colony can be picked the following day. Since a colony is derived from a single bacterium that was initially deposited on the plate, it is theoretically composed of identical cells.
Materials
- Bacteria (liquid culture, freezer stock, colony on a different plate, etc.. The possibilities are endless.)
- Wooden sticks
- Petri plate of the appropriate media (with antibiotic if required)
Procedure
- 🖊️ Label the bottom of your petri plate with your name, the date, and the sample that you are streak plating.
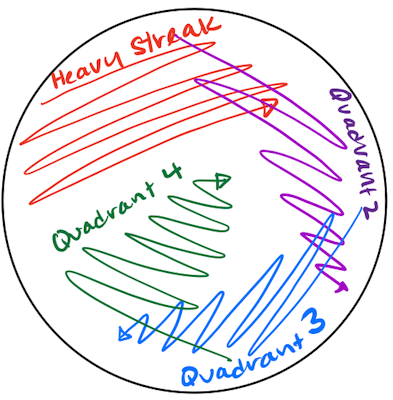
- 🪵 Use a wooden stick to scoop up your bacterial sample, then smear it on one side of the plate in an area corresponding to the heavy streak quadrant in the figure below.
Be careful to keep track of the “sterile” end of the stick! Make sure it doesn’t touch anything before scooping up your sample. Then, make sure that scooped sample doesn’t touch anything other than your petri plate.
- 🗑️ Discard your used wooden stick in the used sticks bin.
- 🪵 Get a new wooden stick and drag the tip through a portion of the heavy streak quadrant, picking up some bacteria. Then, smear the tip in the area of the plate corresponding to Quadrant 2 in the figure.
- 🗑️ Discard your used wooden stick in the used sticks bin.
- 🔁 Repeat steps 4 and 5, filling out Quadrants 3 and 4.
- 🌡️ Incubate plates at 30℃ overnight.
Liquid cultures
Objective
To grow bacteria in a liquid culture such that it can be used for downstream experiments.
Rationale
Many protocols make use of bacteria grown in liquid culture, as liquid culture typically allows for relatively homogenous growth and the production of immensely high numbers of bacterial cells. Under ideal conditions, many bacteria grow incredibly rapidly such that when bacteria are introduced into a liquid growth medium and allowed to replicate overnight, the culture will become very dense – containing hundreds of millions of cells per milliliter. Once you have a dense bacterial culture, you can use it for a bunch of different experiments!
Materials
- Bacteria (Ideally a single colony struck out on a plate, but other sources also work.)
- Wooden sticks
- Culture tube
- Liquid media (with antibiotic if required)
Procedure
- 🖊️ Label a culture tube with your name and the sample you will be using to inoculate.
- ➕ Add 2 mL liquid LB media to your culture tube using a serological pipette.
Remember to always get a fresh serological pipette before pipetting from your sterile stock! Do not re-use pipettes!
- 🪵 Use a wooden stick to scoop up your bacterial sample, then dip the sample into your liquid media and swish the stick around a few times.
Keep track of where you have touched your wooden stick and do your best to not put any part of the stick you have touched into the culture tube. If you can, only touch the stick from the very end.
- 🗑️ Discard your used wooden stick in the used sticks bin.
- 🌡️ Incubate cultures at 30℃ overnight.
Phage serial dilutions
Objective
To prepare liquid phage samples of decreasing concentrations.
Rationale
Serial dilution is a method used to manipulate the number of phages in a sample. You will use serial dilutions to purify, amplify, and titer your phage. This protocol uses 10-fold serial dilutions, meaning that the concentration of phage in each tube is 10 times less than the previous tube, allowing for simple mathematical calculations.
Materials
- Phage samples (Picked plaques or lysate)
- SM buffer
- Microcentrifuge tubes
Before you start:
- First, you must determine the number of dilution you want to make. This will depend on the experiment you are doing and the phage you are working with.
- If you are diluting an enriched culture for the plaque assay, diluting to 10-5 is usually sufficient.
- If you are diluting to titer a plate lysate, you may need to dilute to 10-8 to obtain a countable number of plaques. You want to plate a dilution that can produce 20–200 plaques.
Phages at low concentration tend to lose viability over time when they are stored in phage buffer. Therefore, storing serial dilutions is not recommended.
Procedure
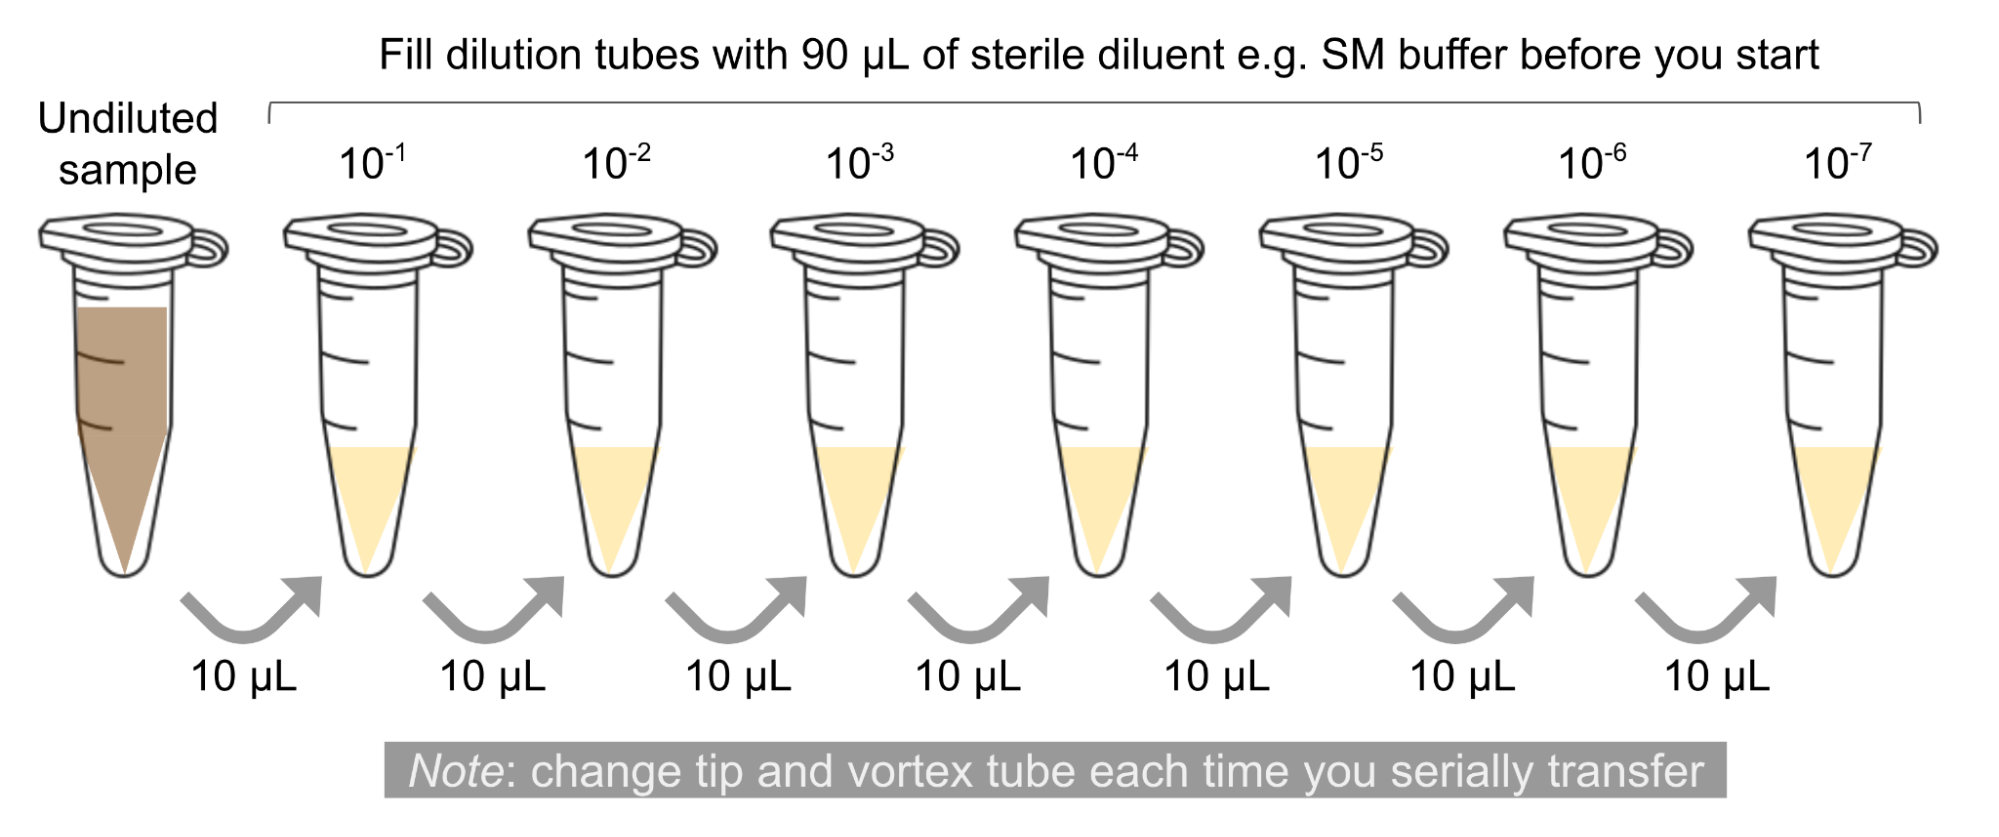
- 🖊️ Arrange the proper number of microcentrifuge tubes in a rack and label them: 10-1, 10-2, …, 10-n.
- ➕ Add 90 μl of phage buffer to each of the tubes.
- ➕ Add 10 μl of your undiluted phage sample to the 10-1 tube.
The solution in this 10-1 tube contains 1/10th the number of phage particles as your undiluted sample. It is also referred to as a 1:10 dilution.
- 🌪 Vortex the tube well.
Make sure to use a clean pipette tip for each transfer and pipette carefully, vortexing your sample well before making each dilution. Otherwise, you will not make accurate 10-fold dilutions.
- Transfer 10 μl of the 10-1 sample to the 10-2 tube.
- 🌪 Vortex the tube well.
This solution contains 1/100th as many phage particles as your undiluted sample. It can also be referred to as your 1:100 dilution.
- Continue each successive 10-fold serial dilutions, as show in the figure below, until you get to your last tube.
Filtering phage lysates
Objective
Remove bacterial cells from a sample with phage. You will obtain what we call a phage filtrate
Rationale
Phages are smaller than bacteria. We will pass our sample through a filter with holes small enough (0.22 μm) to allow the phage to go through while trapping the bacterial cells. This method allows us to extract phages from mixtures, like environmental samples or phage lysates.
Materials
- Phage lysates
- Microcentrifuge tubes
- 2 mL syringes
- 0.22 μm syringe filter
Procedure
- For each phage lysate you want to filter, label a corresponding microcentrifuge tube.
- Open the syringe and remove the plunger.
- Carefully, peel open the syringe filter, keeping the flat side up. The fitler is sterile! Avoid touching it, and do not take the filter out of its package!
- Screw the syringe with no plunger into the filter. This can be tricky, because you want to keep the filter in its package during this procedure. You can balance the synringe and filter on a tube rack.
- Pipette 1.5 mL of the lystate into the syringe.
- Open a labeled microcentrifuge tube and place the syringe and filter on top.
- Insert the plunger into the syringe and slowly push the lysate through.
- Once done, dispose of the syringe and filter, and close the microcentrifuge tube.