Pipetting Exercises
Table of contents
Pipette Anatomy
We will be using pipettes for almost every experiment this summer. It will be important to learn the parts of the pipettes and how to use them so you are comfortable working with them.
Materials
- Pipettes
Procedure
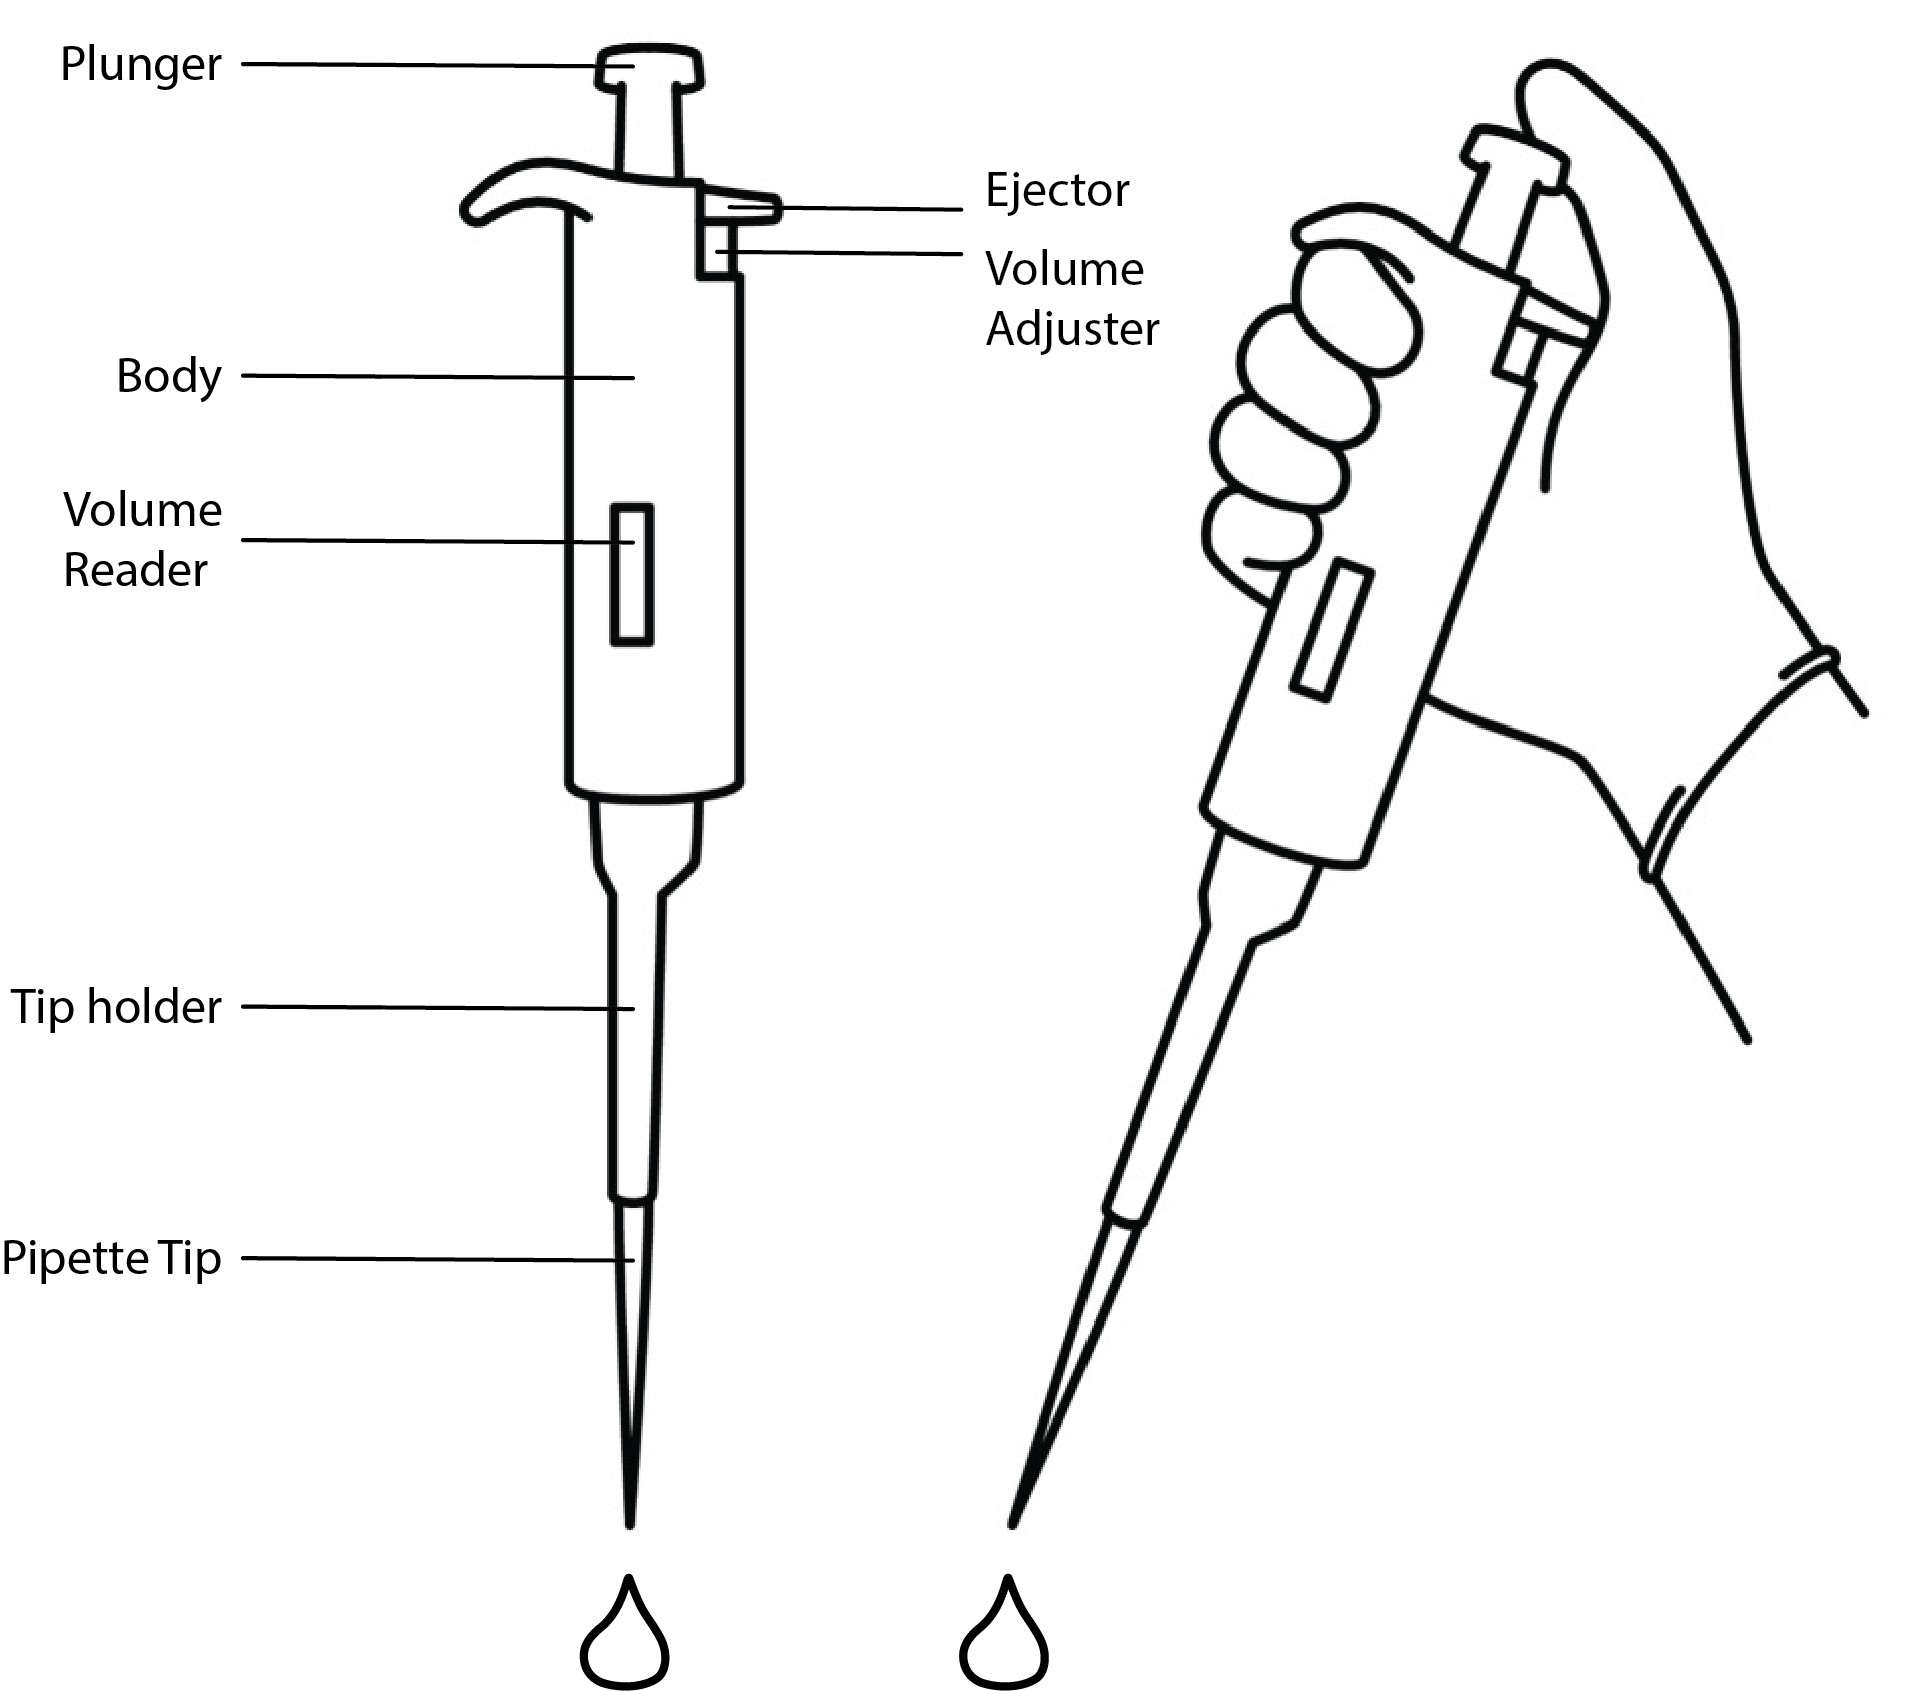
- 👀 Look through the diagram below and the pipettes you have on your bench. Your pipettes may look slightly different.
Each pipette will be labeled with P2, P20, P200, or P1000. These labels tell you the volume each pipette can handle. Make sure you have one of each type of pipette.
- 🖊️ Go through the following list and check off the parts as you locate them on your pipettes.
- Plunger
- Body
- Volume Reader
- Ejector
- Volume Adjuster
- Tip holder
- 🧑🔬Put a pipette tip onto your P20 pipette, push the plunger to the first then second stops, release the plunger, and eject the tip.
Pipette varying liquids
Objective
Compare pipetting water to pipetting glycerol.
Rationale
Different substances that you pipette will feel different as you pull them into the pipette tip and eject them again. In particular, this may come up while processing your environmental samples from the farm. In this exercise, you will get a feel for pipetting different liquids and how to adjust for viscosity.
Materials
- Pipettes (P20 and P200)
- Pipette tips
- Microcentrifuge tubes
- Water
- Glycerol
Procedure
- 🖊️ Obtain 6 microcentrifuge tubes and label them W5, W20, W200, G5, G20, G200.
- ➕ Add 5uL of water into the W5 tube
- ➕ Add 20uL of water into the W20 tube
- ➕ Add 200uL of water into the W200 tube
- ➕ Repeat the steps above but with glycerol into the G5, G20, and G200 tubes.
- ❓Did you notice a difference between the water and the glycerol? Did you have to pull one up more slowly than the other?
- ➕ Repeat any of the above as necessary to get the hang of pipetting the different liquids.
Pipette colored liquids
Objective
Practice mixing liquids in the correct volumes without contamination.
Rationale
Much of what we do will involve using pipettes to mix different reagents, cell cultures, and media together. This protocol will take you through some practice mixing liquids and give visual feedback on how it’s going. At the end of the protocol, you should have 6 microcentrifuge tubes, each with 1,000uL, in the colors of the rainbow.
Materials
- Pipettes (P20, P200, and P1000)
- Pipette tips
- Microcentrifuge tubes
- Water
- Red, blue, and yellow food coloring
- 96 well plates
Procedure
- 🖊️ Obtain 6 microcentrifuge tubes and label them R1, O1, Y1, G1, B1, V1
- ➕ 900uL water to the R1, Y1, and B1 tubes.
- ➕ Add 100uL of red food coloring into the R1 tube. Pipette up and down to mix.
- ➕ Repeat adding blue food coloring to B1 and yellow to Y1.
- ➕ To create V1, add 100uL of R1 and 10uL of B1. Pipette up and down to mix.
- ➕ To create O1, add 100uL of Y1 and 20uL R1. Pipette up and down to mix.
- ➕ To create G1, add 100uL of Y1 and 20Ul B1. Pipette up and down to mix.
- 🖊️ Obtain 6 more microcentrifuge tubes and label them R2, O2, Y2, G2, B2, V2
- ➕ Add 900uL water to each of these tubes.
- ➕ Add 100uL of R1 into R2. Pipette up and down to mix.
- ➕ Repeat for O2, Y2, G2, B2, V2.
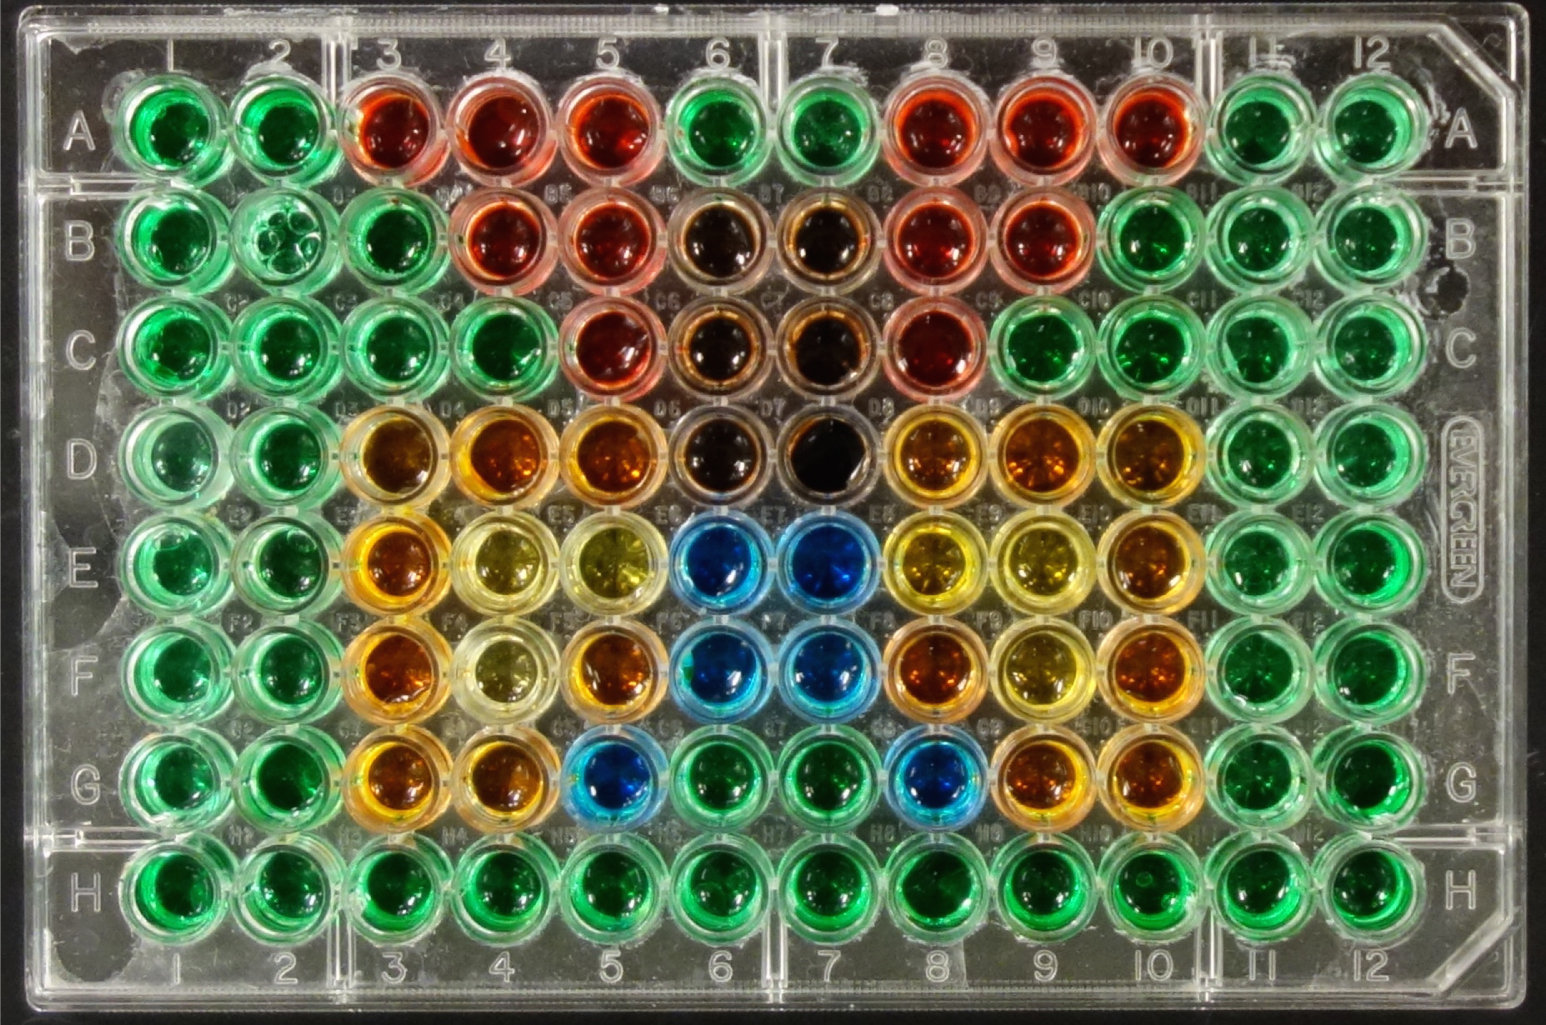
- 🎨 If there is time, pipette the colors you created in R2, O2, Y2, G2, B2, and V2 into the wells of your 96 well plate. Each well will hold 200uL maximum, but play around with different volumes. Make some art as shown below!

Images and inspiration from Burnette et al 2021
Serial dilutions
Serial dilution is a method used to manipulate the amount of something in a sample. In the future, you will be working with phage stocks of unknown concentrations. You will use serial dilutions to purify, amplify, and titer your phage. This protocol uses 10-fold serial dilutions, meaning that the concentration of dye in each tube is 10 times less than the previous tube, allowing for easy mathematical calculations.
Materials
- Fluorescein
- Water
- Microcentrifuge tubes
Procedure
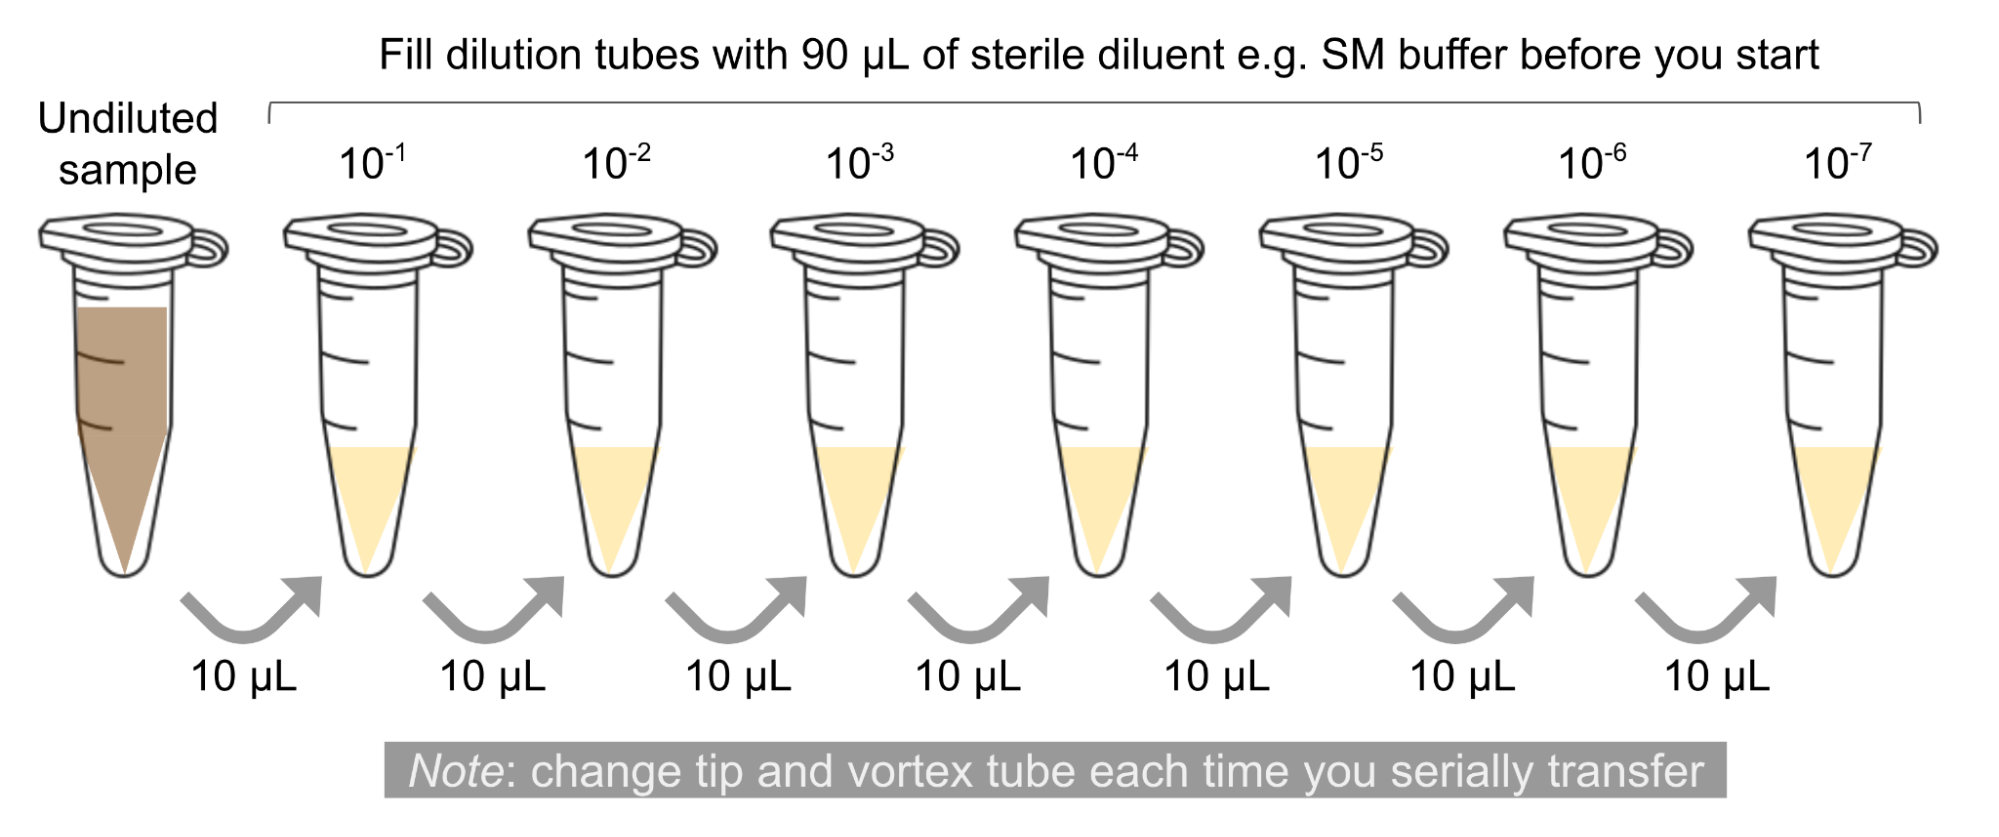
- 🖊️ Arrange 7 microcentrifuge tubes in a rack and label them: 10-1, 10-2, …, 10-7.
- ➕ Add 90 μl of water to each of the tubes.
- ➕ Add 10 μl of fluorescein to the 10-1 tube. Pipette up and down to mix.
The solution in this 10-1 tube contains 1/10th the concentration as the undiluted stock. It is also referred to as a 1:10 dilution.
- 🌪 Vortex the tube well.
Make sure to use a clean pipette tip for each transfer and pipette carefully, vortexing your sample well before making each dilution. Otherwise, you will not make accurate 10-fold dilutions.
- Transfer 10 μl of the 10-1 sample to the 10-2 tube. Pipette up and down to mix.
- 🌪 Vortex the tube well.
This solution contains 1/100th as many phage particles as your undiluted sample. It can also be referred to as your 1:100 dilution.
- Continue each successive 10-fold serial dilutions, as shown in the figure below, until you get to your last tube. This tube is a 1:10 million dilution of your original dye!